IO
What IO Does
The IO (input/ output )tab displays all configured IO ports across the platform in a table view. Each row represents one IO port and shows its ID, date, device, name, site, type, and whether it appears on the map or Salvo.
IO ports are classified as either Input (receiving a signal from an external source) or Output (sending a signal to trigger a physical action such as opening a gate or activating an alarm).
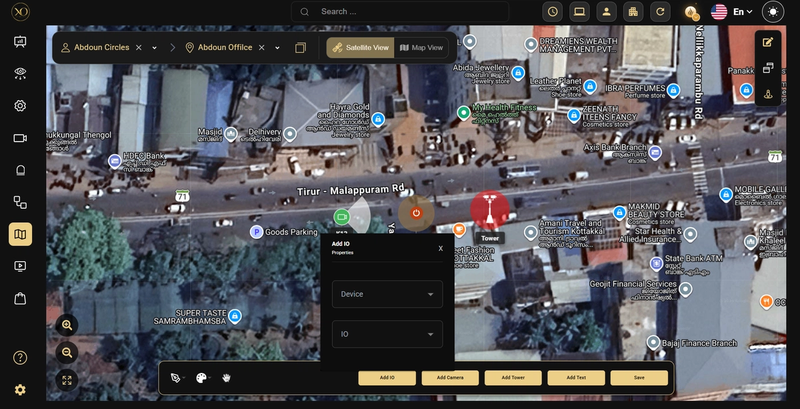
IO ports can also be placed directly on the map, allowing operators to trigger them visually from the map interface.
Why It Matters
IO ports connect GCXONE to physical devices such as access gates, locks, and alarm systems. Without a centralized view, administrators have no visibility into which ports are configured, what type they are, or whether they are visible on the map.
The IO tab solves this by listing all ports in one place and giving administrators the ability to edit configurations and export data without navigating to each device individually.
How It Works
The table displays the following columns for each IO port:
- Id — the port identifier
- Date — when the IO port was registered
- Device — the device the port belongs to (e.g. AcuSense)
- Name — the port name or number
- Site — the site the device is associated with
- Type — the port type:
inputoroutput - Show on Map — whether the IO port is visible on the map:
YesorNo - Show on Salvo — whether the IO port appears in Salvo:
YesorNo - Actions — available actions for each row
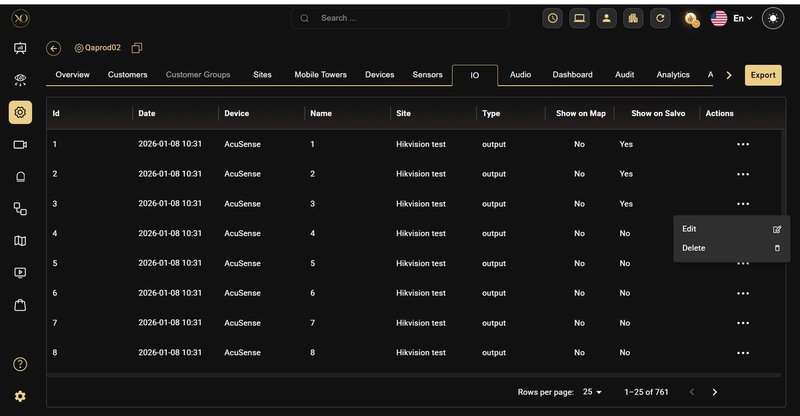
Clicking ⋯ on any row opens a menu with two options: Edit and Delete.
Clicking Edit opens the Edit IO dialog with the following fields:
- Type — Input or Output
- Name — the port name
- Display Name — the name shown in the interface
- Id — the port ID
- IO URL — the URL associated with the IO port
- Time Duration — how long the IO activates (e.g. 5 seconds)
- Zone — the zone associated with the port
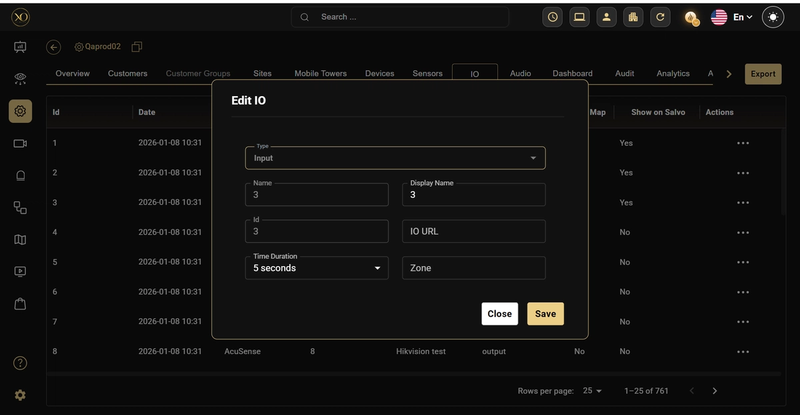
Clicking Save applies the changes. Clicking Close dismisses the dialog without saving.
The Export button at the top right exports the full IO table.
IO on the Map
IO ports can be added to the map in edit mode using the Add IO button. The dialog requires selecting a Device and an IO port. Once placed, IO ports can be triggered directly by clicking their icon on the map.
Key Capabilities
- Centralized IO view — See all IO ports across the entire platform in one table.
- Input / Output classification — Each port is classified as Input (receives a signal) or Output (triggers a physical action).
- Edit — Update the type, name, display name, IO URL, time duration, and zone for any port.
- Delete — Remove an IO port directly from the table.
- Show on Map — IO ports marked Yes appear on the map and can be triggered from the map interface.
- Show on Salvo — IO ports marked Yes appear in the Salvo view.
- Export — Export the full IO table.
- Map integration — IO ports can be added to the map using the Add IO button in map edit mode, by selecting a Device and IO port from the dialog.
Real-World Use Cases
- An administrator reviews all output ports across the platform and edits the time duration for a gate lock from 5 seconds to 10 seconds.
- An operator triggers an IO port directly from the map to open an access gate during an incident.
- An administrator exports the IO table to audit which ports are configured and which are visible on the map.
- A service provider identifies IO ports with no site assigned and updates their configuration.
Best Practices
- Set the Display Name clearly so operators can identify the IO port quickly on the map and in Salvo.
- Use the Time Duration field to control how long an output activates — keep it short for gates and locks to avoid unintended extended access.
- Review the Show on Map column regularly to ensure only relevant IO ports are visible to operators on the map.
- Use Export to maintain an up-to-date record of all configured IO ports across the platform.
Additional Details
- Access path — Configuration Page → Service Provider Level → IO tab.
- Type — IO ports can be configured as Input or Output from the Edit IO dialog. Input ports receive signals from external sources; Output ports send signals to trigger physical actions.
- Map integration — IO ports are added to the map from within the map edit mode using the Add IO button. The dialog requires selecting a Device and an IO port.
- Export — The Export button is available at the top right of the IO tab and exports the full table.
- Total records — The pagination shows the total number of IO ports across the platform (e.g. 1–25 of 761).