
HealthCheck
On this page
What HealthCheck Does
HealthCheck automatically monitors every connected camera in your fleet. It verifies each camera is reachable, streaming, and delivering a valid image.
The feature is built around three goals:
- Validate that all cameras are online and functioning correctly.
- Deliver proactive alerts for failed or degraded feeds.
- Give operators flexible control via scheduling, manual execution, and hierarchy-based configuration.
Why It Matters
Large camera networks fail silently. Cameras go offline, get obstructed, or get tampered with. No one notices until an incident exposes the gap. HealthCheck eliminates that risk.
- Camera connectivity loss or total offline status.
- Blocked, obstructed, or vandalized lenses.
- Low-light or night conditions making video unusable.
- Overexposed or washed-out images from glare or direct light.
- Camera movement or deliberate tampering.
- Software-level failures - no license, no signal.
Without automated monitoring, these issues go undetected. Coverage gaps grow until an incident exposes them.
How It Works
When HealthCheck runs, the platform executes the following steps:
- Connects to the camera live stream
- Captures a snapshot from the feed
- Analyzes the image against configured checks
- Generates a health verdict, healthy, low light, obstructed, and more
- Records and displays results in the platform interface
HealthChecks run automatically on a schedule or on demand. Operators can trigger manual checks from the interface at any time.
HealthCheck Modes
Three monitoring modes are available, each designed for a different level of operational need:
Mode | Function | Frequency | Event Codes | Strategy |
|---|---|---|---|---|
Basic | Verifies cameras provide a valid image | Every 12 hours | Camera.health.fail Camera.health.normal | Reactive |
Plus | All Basic capabilities + on-demand checks and reporting | 15 Min - 4 Hrs | Camera.health.fail Camera.health.normal | Proactive |
Advanced | All Plus capabilities + AI image analysis and anomaly detection | Flexible | analytics.healthcheck analytics.novideo | Predictive |
HealthCheck Advanced is licensed per camera.
Key Capabilities
- Continuous Camera Monitoring: Periodically verifies each camera is reachable and delivering a valid stream
- Automatic Failure Detection: Identifies cameras that are offline, unreachable, or delivering degraded feeds
- Image Condition Analysis: Detects low light, glare, obstructions, and conditions affecting video usability
- AI-Based Anomaly Detection: In Advanced mode, AI models analyze snapshots to detect tampering, tilt, and obstruction
- Flexible Scheduling: Run checks automatically at configurable intervals or trigger them on demand
- Hierarchical Configuration: Apply settings at any level of the platform hierarchy, from Service Provider down to individual sensors
- Centralized Dashboard: Color-coded indicators give instant visibility into healthy and failed cameras across all sites
Visual Indicators and Status Display
A search bar is available to find customers and sites directly from a single input — no more scrolling through long lists. The Customer → Site selector flow is clearer and faster to narrow down to the exact scope you need. The selected Customer and Site persist as you move between Dashboard, Health Check, Video Search, Maps, and Configuration — pick a site once and it stays selected wherever you go. Narrowing further to a specific device reveals a Select Sensor dropdown — its search list shows a checkbox beside each matching camera, so you can select more than one at once instead of viewing them one at a time.

Figure 1: Customer and site search and selector.
The HealthCheck dashboard is in the left sidebar (eye icon). Summary cards show Checked Cameras, Healthy Cameras, Connection Failure, Black Screen Cameras, Low Light Cameras, Obstructed Cameras, and No Reference Images.
Cameras display in grid or list view. Each shows its health status and last check timestamp. Use filters to narrow results quickly:
- Status filter: Healthy, Failed, or No Reference Image
- Camera Type filter: Narrow results to a specific device or sensor type
- Include Inactive Sensors: Show cameras that are not currently active
- Include Excluded Sensors: Show cameras manually excluded from HealthCheck
- Generate Report: Create a downloadable HealthCheck report for the selected customer
Camera Status States
Status | Color | Meaning |
|---|---|---|
Healthy | Green | Camera passed the most recent HealthCheck — streaming normally and image quality confirmed |
Failed | Red | Camera failed the most recent HealthCheck — streaming issue or image quality problem detected |
Unavailable | Red | Camera could not be reached during the check — connection failure or device offline |
No Reference Image | Red | Camera has no reference image set — check ran but comparison could not be performed |
Failed, Unavailable, and No Reference Image all display in the same red — distinguish between them using the status label text, not the color.
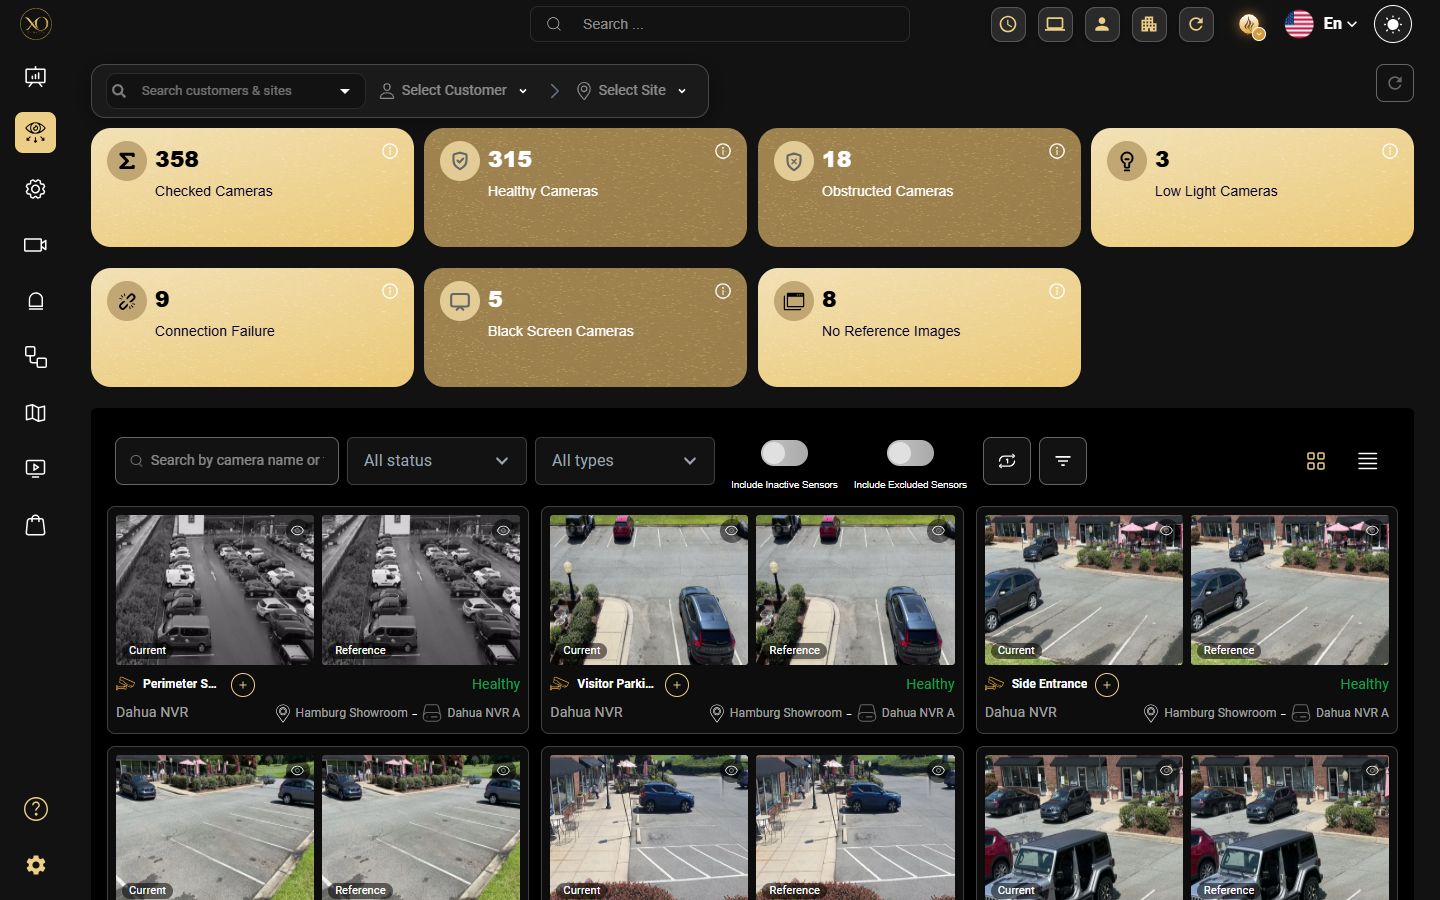
Figure 2: HealthCheck dashboard – summary cards.

Figure 3: HealthCheck list view.

Figure 4: Camera detail view.
Real-World Use Cases
- Fleet Health at Scale: A monitoring center manages 500+ cameras across 50 sites. HealthCheck runs hourly checks and flags offline cameras before the morning shift. Technicians are dispatched before any operator notices a gap.
- Tamper Detection: A perimeter camera is physically repositioned overnight. Plus tier detects the angle deviation and triggers an alarm. The issue is resolved before the next incident.
- Maintenance Windows: A site undergoes scheduled network maintenance. The operator pauses HealthCheck for affected devices. False alarms are suppressed and the alarm queue stays clean.
- Compliance Reporting: A customer requires monthly proof that all cameras were operational. HealthCheck generates the report automatically and delivers it on schedule.
Best Practices
- Use Advanced mode for high-security or high-value deployments where predictive monitoring matters
- Configure HealthChecks at the Customer or Site level to ensure full coverage without configuring each camera individually
- Update Tampering and Tilt reference images after any scene change, repositioning, or infrastructure work
- Disable on-screen overlays on cameras enrolled in Advanced mode to improve AI accuracy
- Use on-demand checks after any camera maintenance, repositioning, or infrastructure change
- Monitor the HealthCheck dashboard regularly and set up alert notifications for Camera.health failures to catch issues early.
Additional Details
Advanced Analysis Pipeline
In Advanced mode, each snapshot runs through an ordered sequence of checks. The pipeline stops at the first detected issue.
# | Check | Notes |
|---|---|---|
1 | Low Light / No Connectivity | Highest priority — evaluated first |
2 | No Video Signal / No License | Runs on very dark images only (<10% brightness) |
3 | Audio-Only Device Detection | Prevents misclassification of audio hardware |
4 | Color Bar Test Pattern | Detects calibration patterns in feed |
5 | Overexposure / High Glare | Two-stage neural + physical validation |
6 | Obstruction Detection | Single-image lens blockage detection |
7 | Tampering & Tilt Detection | Disabled by default; requires reference images |
Note: Only the highest-priority issue detected is reported per camera per check cycle. This ensures clear, actionable verdicts without conflicting signals.
Check Specifications
The following sections describe each HealthCheck in detail, including verdicts returned and configuration parameters.

Figure 5: Check Specifications – the HealthCheck dashboard.
8.1. Low Light and Connectivity Detection
Determines whether the feed is too dark to be usable, or whether the camera appears offline.
Verdicts
Condition | Verdict |
|---|---|
Camera appears completely offline | no connectivity |
Scene is too dark to be usable | low light |
Brightness is at an acceptable level | Pass (no verdict) |
Capabilities | Limitations |
|---|---|
Uses dual thresholds to distinguish between a disconnected camera and a legitimately dark scene | Mixed scenes (half dark / half bright) may average to an acceptable brightness reading |
Automatically detects fisheye lenses and compensates for circular black borders | Dim startup screens slightly above the offline threshold may not be flagged |
Fully ROI-aware — brightness is calculated only within the defined region of interest | |
Delivers consistent verdicts for unchanged scenes across nightly checks, with 95.3% low-light detection accuracy |
Configuration Parameter
Parameter | Description |
|---|---|
lowlight_threshold | Brightness percentage below which the scene is classified as low light |
8.2. No Video Signal / No License Detection
Scans dark frames for VMS overlay text indicating a software-level failure - no license or no signal.
Verdicts
Condition | Verdict |
|---|---|
VMS overlay indicates signal loss | no video |
VMS overlay indicates license issue | no license |
Dark frame with no overlay text | Pass (handled by Low Light check) |
Capabilities | Limitations |
|---|---|
Detects common VMS overlay messages on dark frames | Only activates on very dark images (below 10% brightness) |
Differentiates a legitimately dark scene from a software-level feed failure | English-language overlay text only — other languages not supported |
Non-black backgrounds with error messages are not detected |
8.3. Audio-Only Device Detection
Identifies whether a snapshot originates from an audio-only device. Prevents false failures on non-visual sensors.
Verdicts
Condition | Verdict |
|---|---|
Snapshot is from an audio-only device | audio device detected |
Snapshot is from a camera feed | Pass (continues pipeline) |
Capabilities | Limitations |
|---|---|
Prevents audio devices from being incorrectly classified as disconnected cameras | Only triggers on very dark images |
No device metadata required — fully automated classification | Audio devices with bright UI screens may not be detected |
8.4. Color Bar Test Pattern Detection
Detects calibration test patterns in the camera feed. Indicates the camera is in a test or maintenance state.
Verdicts
Condition | Verdict |
|---|---|
Calibration test pattern detected | color bar |
No test pattern present | Pass (continues pipeline) |
Capabilities | Limitations |
|---|---|
Requires multiple uniform vertical color bands — highly specific detection | Detects vertical patterns only — rotated or non-standard patterns are not detected |
Extremely low false-positive rate on natural real-world scenes | Desaturated or faded test patterns may not trigger |
Texture and entropy validation provides high confidence before triggering |
8.5. Overexposure / High Glare Detection
Detects washed-out frames caused by strong light sources, direct sunlight, or reflective surfaces.
Verdicts
Condition | Verdict |
|---|---|
Frame is excessively bright / washed out | high_glare |
Brightness is within acceptable range | Pass (continues pipeline) |
Capabilities | Limitations |
|---|---|
Two-stage validation: neural model prediction followed by physical glare density verification | Cannot always distinguish glare from very bright or colorful surfaces |
Reduces false positives from naturally bright but visually detailed scenes | Small/localised glare may not trigger depending on model confidence |
ROI-aware masking excludes regions outside the monitoring area |
8.6. Obstruction Detection
Detects physical blockage of the camera lens - spray paint, tape, cloth, or objects in front of the camera.
Verdicts
Condition | Verdict |
|---|---|
Lens is physically blocked | obstructed |
Lens appears unobstructed | Pass (continues pipeline) |
Capabilities | Limitations |
|---|---|
Single-image classification — no historical baseline or reference image required | Partial obstructions such as cobwebs or condensation may be missed |
Provides immediate detection from the very first snapshot after deployment | Transparent obstructions are difficult to detect |
Cannot always distinguish between lens blockage and a large nearby object |
8.7. Tampering and Tilt Detection
Detects whether a camera has been physically redirected or moved from its original position.
Configuration Note: This check is disabled by default. It requires reference images to be provided with every request and cannot be used simultaneously with Obstruction Detection.
Verdicts
Score | Verdict | Meaning |
|---|---|---|
> 90% | clear | Acceptable — no significant change detected |
80–90% | tilted | Possible slight camera movement |
75–80% | clear (variation) | Within tolerance — minor variation only |
< 75% | tamper | Significant camera redirection detected |
Capabilities | Limitations |
|---|---|
Compares current snapshot against a reference image using similarity scoring | Requires up-to-date reference images — seasonal scene changes can produce false alerts |
Detects both gradual drift and sudden camera redirection | Cannot be used simultaneously with Obstruction Detection |
Disabled by default; must be explicitly enabled and configured |
Recommendations for Best Results
- Mask very bright areas outside the camera perimeter to reduce interference.
- Disable camera-side image preprocessing before capturing reference images.
- Disable on-screen overlays - timestamps and labels - where possible.
- Update reference images to account for seasonal or significant scene changes.
Step 9: Configuration
9.1 Hierarchical Configuration
HealthCheck settings apply at any level of the platform hierarchy. A camera inherits the setting from the nearest level above it where a configuration exists.
Service Provider > Customer > Site > Device > Sensor (Camera)
If no HealthCheck setting exists at the camera (sensor) level, the platform falls back to the device level, then site, then customer, then the Service Provider default.
9.2 Subscribing Cameras - Analytics Tab
To subscribe cameras to HealthCheck, navigate to the configuration then target level in the hierarchy tree and open the Analytics tab.

Figure 6: Analytics tab at Service Provider level.

Figure 7: Camera Health Check row controls – settings icon and Subscribe all.
9.3 Update Analytics Dialog
When subscribing, select a schedule from the Time Range dropdown. Available options vary by HealthCheck tier.

Figure 8: Update Analytics dialog.
Operators can also trigger a HealthCheck on any camera at any time using Run Once. A useful setup is to schedule HealthCheck twice daily, overnight and during business hours, to catch both after-hours and daytime failures.
9.4 Analytics Scheduler
The Analytics Scheduler lists all active HealthCheck jobs across all customers. Use it to audit coverage and find sites with no active schedule.

Figure 9: Analytics Scheduler.
9.5 Enabling HealthCheck - Step by Step
- Log in and navigate to Configuration > the target level (Service Provider, Customer, Site, Device, or Sensor)
- In the Analytics tab, locate Camera Health Check. A red X means the camera is not subscribed
- Click the settings icon to open the Update Analytics dialog and select a schedule from the Time Range dropdown
- Click Subscribe. The status column updates to show a green check and the active schedule. Use Subscribe All to activate all cameras under a customer in one action.
9.6 Pause HealthCheck
Suspend HealthCheck temporarily - useful during maintenance windows or planned downtime to prevent false alarms.
Feature | Behavior |
|---|---|
Availability | Subscribed cameras only. Pauses clear automatically if unsubscribed. |
Management | Add/edit/delete pause durations. Future dates only. |
Visibility | Pause Until time shown in camera data table. |
Child Propagation | Applies to child entities without requiring Overwrite. |
Auto-Cleanup | Pauses expire and are removed when end time is reached. |
Execution Block | Scheduler and Run Now are disabled during active pause. |
Pause vs. Tag: Use Pause for time-bounded exclusions with a known end date. Use Tag-based exclusion when the resolution date is unknown.
Step 10: Reporting and Integrations
10.1 Automated Reports
HealthCheck includes a built-in reporting engine. Generate reports on demand or schedule them for automatic delivery.
Reports are generated in two ways:
- Manually: Click Generate Report from the HealthCheck interface at any time
- Scheduled: Configure a recurring schedule to have reports sent automatically

Figure 10: Reports Dashboard.
Scheduled reports support the following frequencies: Daily, Weekly, Bi-weekly, and Monthly. Reports deliver on schedule regardless of whether any failures were detected.
Each generated report includes:
- Report date and time range covered
- Site name and scope, customer and sites included
- Percentage of cameras operating normally, an at-a-glance health score per site
- A snapshot from each camera showing the image captured during the check
- Sensor name, site details, and device information for every camera reviewed
- Connectivity issues, cameras that failed to respond during the check
- Obstruction detections, low light detections, black screen detections, and any other failed check types
Report Customization
Each report schedule is fully customizable. Match your branding and delivery preferences.
"Health check Report" wording is vertically centered to align with the logos. The customer box is aligned correctly when generating reports. Proper line breaks appear below the customer box where needed. Images preserve their original aspect ratio during generation.
Option | Description |
|---|---|
Schedule Name | A label to identify this report schedule (can be saved as a reusable template). |
Report Type | System Healthcheck (uptime; connectivity; hardware health) or Customer Success (usage statistics and optimization recommendations). |
Company Branding | Customize the report with your organization's logo; brand colors; and email styling. Full report templates can be built and saved for reuse across multiple schedules. |
Email Recipients | Define one or more email addresses to receive the report automatically on each scheduled delivery. |
Scheduled Sending Time | Set the exact time the report is generated and sent on each cycle. |
Customers & Sites Scope | Select which customers and sites are included in each report schedule. |
Note: Report schedules can be saved as templates for reuse. The Reports dashboard shows Active Schedules, Reports Sent This Month, and Failed Deliveries at a glance — allowing administrators to monitor delivery health.
Steps to Schedule a New Report:
Step 1 – Reports Dashboard (Fig 11.a) Navigate to Settings → Reports to view the Reports dashboard, which displays:
- Active Schedules, Reports Sent This Month, and Failed Deliveries
- Click "+ Create New Schedule" to begin.

Figure 11.a: Reports Dashboard overview.
Step 2 – Select Report Type (Fig 11.b)
- Enter a Schedule Name
- Optionally enable Save as Template to reuse the configuration later
- Choose a report type: System Healthcheck or Customer Success.

Figure 11.b: Select report type.
Step 3 – Select Scope (Fig 11.c) Select the customers and sites to include in the report.

Figure 11.c: Select scope.
Step 4 – Data Filtering (Fig 11.d & 11.e) Refine the data by Status, Camera Technology, Manufacturer, Tags, and language.

Figure 11.d: Data filtering.
Step 5 – Schedule Frequency (Fig 11.e) Set the frequency (Daily/Weekly/Bi-Weekly/Monthly), time, and timezone.

Figure 11.e: Schedule frequency configuration.
Step 6 – Report Styling & Email Template (Fig 11.f) Configure branding colors and email template, then click Finish & Schedule.

Figure 11.f: Report styling and email template.
Use Cases
- SLA validation - provide clients with scheduled proof that cameras are healthy and monitored.
- Audit trail - maintain a record of system health over time for compliance and review.
- Proactive communication - notify stakeholders automatically before they ask about system status.
10.2 Alarm Integration and Automated Response
HealthCheck integrates fully with the GCXONE alarm management system. When a camera fails a check, an alarm triggers immediately.
When a failure is detected, the system generates an alarm and sends it to the operator queue immediately, classifies the alarm by failure type — for example, an offline camera triggers an event named "health failed connectivity issues", while an obstructed camera triggers an obstruction event — and makes the camera available for direct inspection via the View action in the HealthCheck interface. HealthCheck alarm integration ensures that camera failures are never silently missed. Every detected issue enters the standard operational workflow, guaranteeing visibility and accountability across the team.
HealthCheck alarms also trigger automated workflows in the platform:
Workflow Action | Description |
|---|---|
Call Technician | Automatically dispatch a field technician when a camera is detected offline or obstructed. |
Send SMS / Email | Notify relevant stakeholders via SMS or email the moment a HealthCheck failure is recorded. |
Escalate Alarm | Escalate unresolved HealthCheck alarms to a supervisor or secondary operator after a defined period. |
Create Support Ticket | Automatically open a support ticket in the integrated ticketing system (e.g. Zoho) for tracking and resolution. |
10.3 Tags and Prioritization
Organize cameras, sites, and devices using Tags - labels with custom names, colors, and icons.
- Tag a site, device, or sensor - and optionally all entities below it.
- Filter HealthCheck to a specific tag to see only the cameras relevant to that task.
- Generate targeted reports scoped to a tag - stakeholders receive only the data relevant to them.
- Save a custom Live View combining tagged devices from different customers and sites.

Figure 12: Tags management.
Coming Soon: Tags will also be available as a dashboard widget filter — allowing you to configure a KPI or analytics widget to display data for a specific tagged group of sites or cameras directly on your dashboard.
10.4 HealthCheck on Mobile Towers
HealthCheck is not limited to fixed cameras. It can also be applied to the mobile tower infrastructure managed through Tower Guard — the same automated connectivity and health checks that run on cameras can be extended to the devices and sensors mounted on mobile towers, giving operations teams unified health visibility across both fixed and mobile deployments.
Step 11: Event Codes
The following event codes are generated by HealthCheck. Use them in downstream integrations, workflows, or alarm routing rules.
Parameter | Description |
|---|---|
Camera.health.fail | A camera has failed a HealthCheck (Basic and Plus modes) |
Camera.health.normal | A camera has returned to healthy status after a failure (Basic and Plus modes) |
analytics.healthcheck | An Advanced HealthCheck has completed and returned a verdict |
analytics.novideo | An Advanced HealthCheck detected a no video signal or no license condition |
camera.health.excluded | Camera excluded from health checks via tag |
Thank you — your feedback goes to the team that owns this page.